Navigate the Document Library
For: Everyone with access to Document Library
Before you start: Sign in to your company's Vega portal.
Last checked: 7 October 2026, fictional local demo v1.126.2 and current library UI
The library has a folder tree on the left and documents on the right. The buttons available to you depend on your permissions and on the section you have opened. The document's status is personal to your account; it is not a count for the whole company.
Find your way around
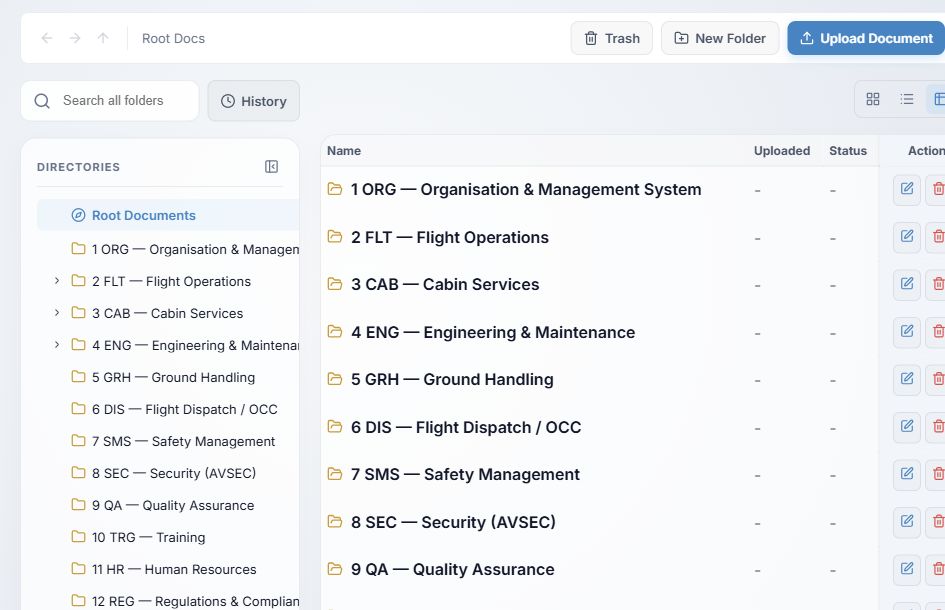
Figure 1. 1 — Back, forward, and up: return to a visited place, move forward again, or go to the parent folder. A grey arrow has nowhere to go. 2 — Root Docs and breadcrumbs: select a segment to jump to that folder. 3 — Trash, New Folder, Upload Document: management actions; they appear only with the relevant edit permission and section. 4 — Search all folders: searches accessible documents by title or distribution group. 5 — History: opens your acknowledged, recently opened, and recently added lists. 6 — Tiles, List, Details: change the presentation, not the records.
- Select Document Library in the main menu.
- Select Root Documents or a folder in Directories. Select a folder's chevron to expand or collapse its children; select its name to open it. Selecting a folder in the right pane opens it too.
- Use Root Docs in the path to return to the library root. Go up to parent folder goes up one level. Go back and Go forward retrace the library places you visited, including History. Browser Back also works.
- Select Hide folder tree to give the document list more room. Folders / Show folder tree brings it back. On a narrow screen the directory pane moves above the documents. On a wide screen, drag the divider between panes to change their widths.
The Search all folders field searches beyond the folder currently open. Enter at least two characters, then wait for the results. Searching all folders in the path confirms the wider scope. Clear the field to return to the folder you had open. In search results, a location chip opens the document's containing folder. Folder names in the tree are not filtered by this document search.
Understand the list and its buttons

Figure 2. 1 — Document title: select the row or card to open the reader. 2 — Location: opens the containing folder when shown in search or History. 3 — Status: your own Action Required, Acknowledged, or Reference Only state. 4 — Action icons: hover for the exact label; the set varies with your role. The details view shown here includes Download PDF, Acknowledgement report, Publish New Revision, Notify Recipients, Edit Document, and Delete Document.
| Control | What it does | Guide |
|---|---|---|
| Tiles view, List view, Details view | Switches between cards, compact rows, and a detail table. Your selection is remembered. | This page |
| Open a document | Opens the current file in the reader. | Read and acknowledge |
| Acknowledge | Opens a required document for reading; a separate confirmation records the signature. | Read and acknowledge |
| Download PDF | Downloads the current file. The icon may retain this tooltip even when the file is not a PDF. | Read and acknowledge |
| Acknowledgement report | Opens current-revision read tracking when acknowledgement applies and you have report access. | Read tracking |
| Publish New Revision | Replaces the current file with a new published revision. | Publish a revision |
| Notify Recipients | Sends a separate announcement for the existing current revision. | Notify recipients |
| Edit Document | Changes title, folder, distribution, or acknowledgement setting without uploading a file. | Edit details |
| Delete Document | Opens a choice to remove a legacy multi-folder link or move the document to Trash. | Trash and restore |
| Edit Folder, Delete Folder | Manages a folder; deleting works only when it is empty. | Manage folders |
In a folder, the right pane shows its immediate subfolders and documents. A Parent Folder entry, when present, goes up one level. The date on a normal document row is the current file's upload date. In History, the date has a different meaning for each tab; see Use History.
If there are many results, use the page controls below the list: Previous page, numbered pages, Next page, Go to, and Per page. These change which results are shown, not the documents themselves. Search and filter changes return to page 1.
Open only documents awaiting your acknowledgement
My Dashboard → Documents Requiring Action lists your assigned documents. Opening the library from that action may show Awaiting acknowledgement only above the results. Select the chip or its × to remove that filter and show all accessible documents. No deadline is still an action when the item says Action Required.
When a button is missing
Reading access does not grant editing access. New Folder and Upload Document appear only where your account may edit the current section; a restricted editor may see a message explaining that no sections have been assigned or that the current section belongs to someone else. Document action icons also require permission to manage that document's section. Trash requires document-management permission. Acknowledgement report requires compliance-view permission. Delete permanently in Trash is reserved for an account with document-purge permission.
If you expected a control, open the correct folder and ask your administrator to check your role and assigned sections. See Why a module or action is missing.