Create and publish a notice
For: Notice managers (NOTICE_MANAGE)
Before you start: Confirm the audience and the text with your company's responsible owner. Open Notices → Manage.
Last checked: 7 October 2026, fictional local demo v1.126.2 and current Notices code
A notice can be saved as a draft or published immediately. Publication makes it available to the selected audience; if read-acknowledgement is required, Vega also sends an announcement email. A draft is visible to notice managers, not recipients.
Open the composer
- Open Notices → Manage. Select New notice (Figure 1, 1).
- Select Type (2) to classify the message as NOTAM, Memo, Safety Bulletin, Circular, or General. General is the new-form default. The type is a label in Vega; selecting NOTAM does not publish an aeronautical NOTAM outside Vega.
- Select Priority (3): INFO, NORMAL, HIGH, or CRITICAL. NORMAL is the default. Priority affects the badge and inbox ordering. It does not by itself require acknowledgement or block access; use those separate controls if needed.
- Enter a short Title (4, maximum 255 characters) and the full Body (5). Include the action, affected people, effective date, and contact route in the body when relevant. The body can contain ordinary links. Both fields are required.
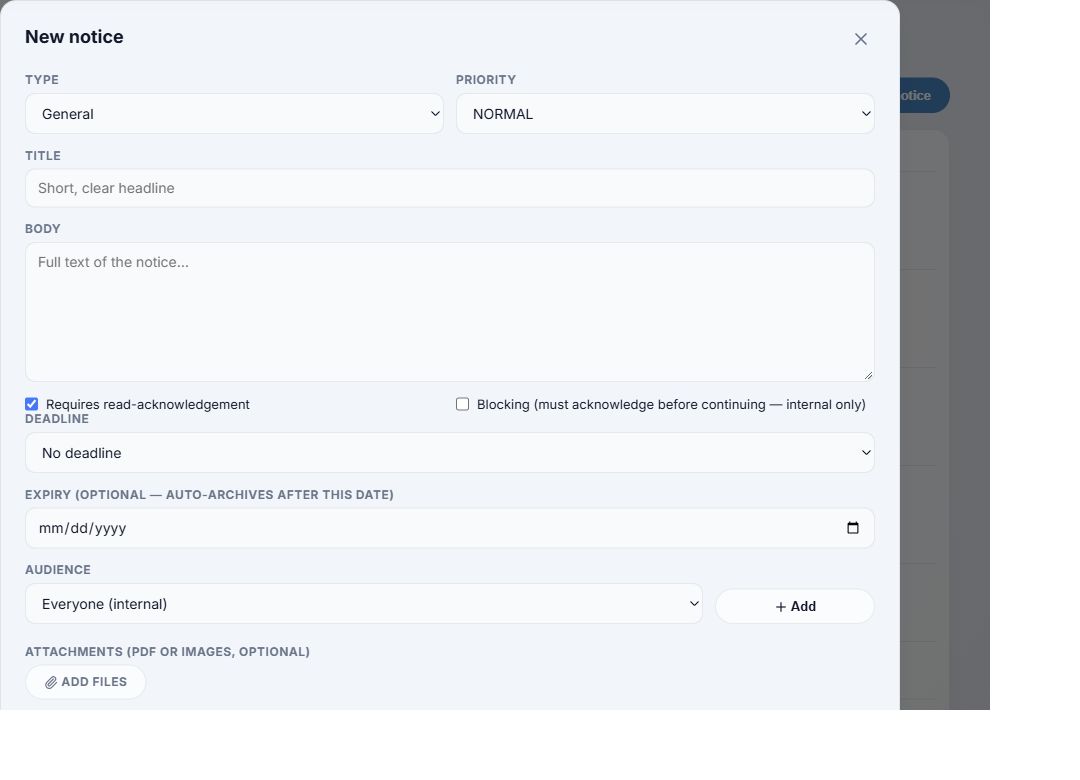
Figure 1. 1 — New notice form: opened from Manage → New notice. 2 — Type: classification. 3 — Priority: visibility and ordering. 4 — Title: headline. 5 — Body: full instruction. 6 — Requires read-acknowledgement: on by default. 7 — Blocking: off by default. This blank example contains no person names.
Set the delivery rules
- Decide whether Requires read-acknowledgement should stay selected (Figure 1, 6). When selected, recipients must explicitly confirm that they read the current version. If you clear it, the notice is informational: no acknowledgement button or deadline is shown.
- Use Blocking (must acknowledge before continuing — internal only) (7) only when readers must confirm before using the rest of Vega. It is off by default and unavailable unless acknowledgement is required. It applies to internal recipients; external partners are not hard-blocked.
- Choose a Deadline, optional Expiry, Audience, and Attachments. The choices and their consequences are explained in Set notice audience, deadlines, and attachments. A notice cannot be published without a target that currently reaches at least one active person.
Save or publish
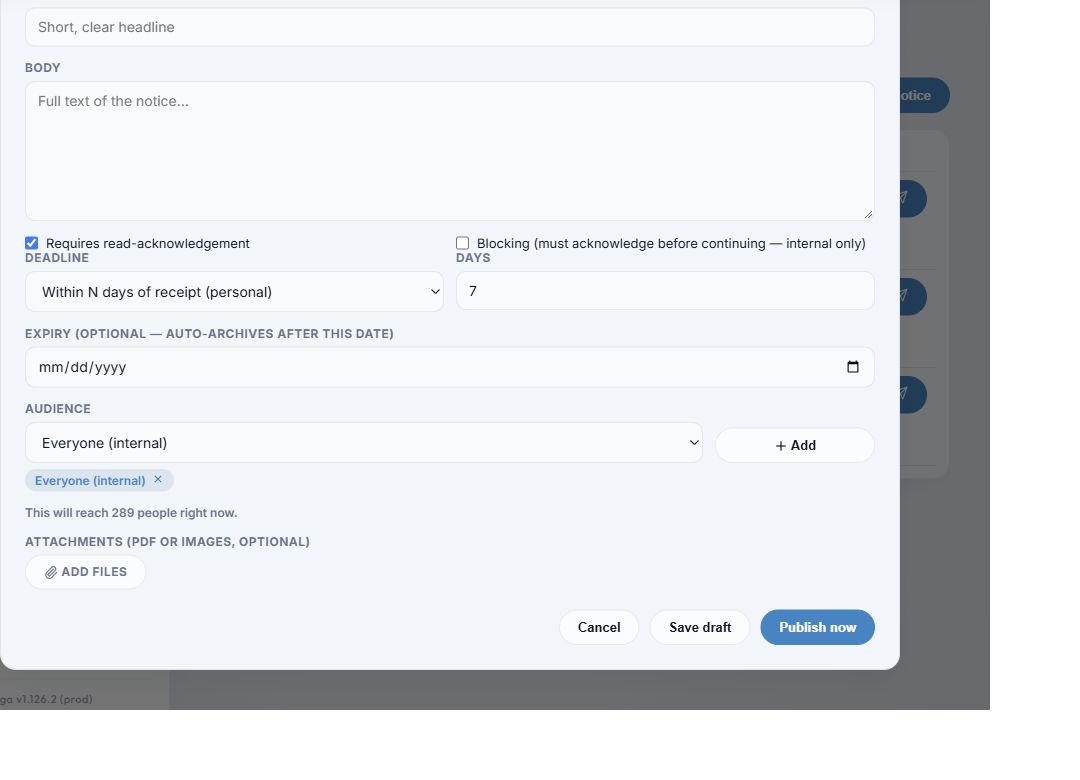
Figure 2. 1 — Deadline: this example uses a personal seven-day window. 2 — Expiry: blank means no scheduled auto-archive. 3 — Audience: Everyone (internal) has been added. 4 — Reach preview: a live count for the current company; it can change as membership changes. 5 — Add files: optional attachments. 6 — Cancel: close the form. 7 — Save draft: keep it for later review. 8 — Publish now: make it active. This screenshot is cropped before any recipient identities.
- Check the title, wording, target chips, reach count, acknowledgement rule, deadline, expiry, and files before choosing Publish now (Figure 2, 8). Publication can trigger email to every currently matched recipient when acknowledgement is required. A zero-person preview blocks publication.
- Choose Save draft (7) when it still needs review. Reopen it from Manage → Draft → Edit draft. A draft may also be published later using the row's Publish button; that row button publishes immediately without reopening the form, so review it first.
- Choose Cancel (6) or the top-right Close button to leave the form. While composing a new notice, Vega temporarily saves meaningful text and targeting choices in this browser and offers Restored your unsaved draft next time. Start fresh clears that browser copy. Attached files are not restored and must be added again. An already saved server draft is reopened with Edit draft instead.
During attachment upload, the progress bar shows the transfer. Its cancel action stops the upload. If a submission fails, read the error, check the draft in Manage, and retry after correcting it. A newly created notice is rolled back when its immediate publication fails where possible; an existing draft remains available for correction.
Verify the result
After a success message, select Manage → Active and locate the title. Published shows its publication date, Read its acknowledged/current-audience count where applicable, and Overdue the outstanding late count. Select View to inspect the published text. For recipients, the notice appears in their Current inbox or Awaiting your acknowledgement, depending on its settings and their status. See Read and acknowledge a notice.
If Manage or New notice is absent, your role may lack NOTICE_MANAGE or the Notices module may not be enabled for your company. Ask your administrator to check Notice settings and access.