Upload and distribute a document
For: Document controllers with edit access to the destination section
Before you start: Check the file's title and revision inside the file, and decide who should receive it.
Last checked: 7 October 2026, fictional local demo v1.126.2 and current upload code
Upload Document creates a published library document. Choose its folder, audience, acknowledgement requirement, deadline, and whether an email should be sent. These are separate choices: a recipient can be told about a reference document without being required to sign it.
Choose the file and location
- In Document Library, open the destination folder and select Upload Document. The form starts with the current folder; at Root Docs it starts at Root Directory.
- In Upload Operational Document, select Choose manual, spreadsheet, presentation or image (Figure 1, 1). The form accepts PDF, Word, Excel, PowerPoint, and common image files. The file is required.
- Check Document Title (2). Vega proposes one from the filename; edit it so a reader can recognise the title and revision. This field is required. A file's own title and revision should agree with this card title.
- Check Target Folder(s) (3). Select Manage Folders to open Select Destination Folders. Use Search Folders, Expand All, Collapse All, the chevrons, and a folder checkbox to find a location (Figure 2). Root Directory removes the folder selection. Select OK (… Selected) to apply the choice or Cancel to leave it unchanged. The current product accepts one destination folder for a document even though the form label says “Folder(s)”. The × on a selected folder chip removes that selection and returns to Root.
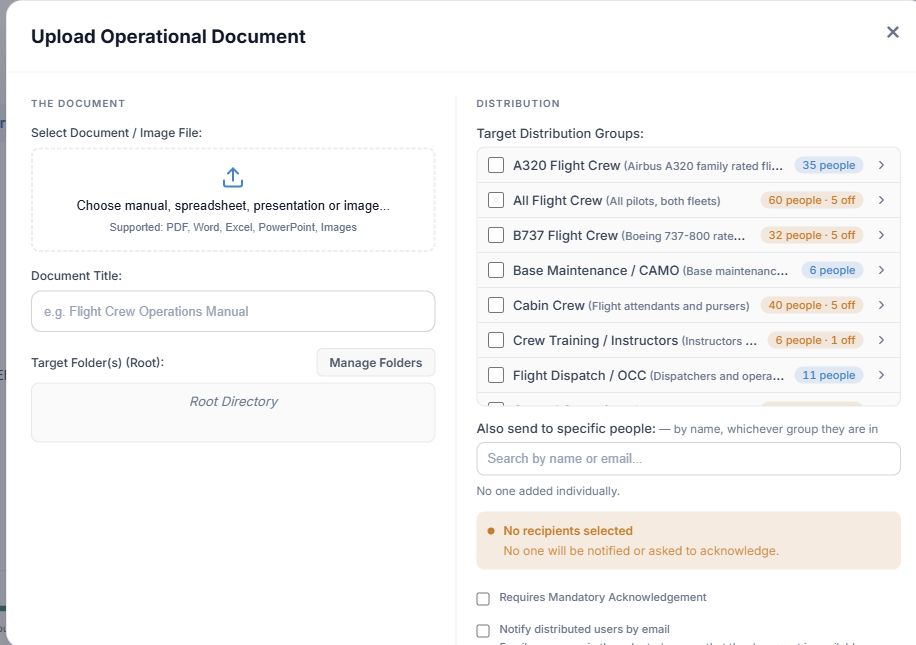
Figure 1. 1 — File picker: choose the file to publish. 2 — Document Title: starts from the filename and is editable. 3 — Target Folder(s) / Manage Folders: choose the section; no folder means Root. 4 — Target Distribution Groups: select groups in the right column. 5 — Specific people: add individuals if needed. 6 — Audience summary: inspect the deduplicated count before upload.
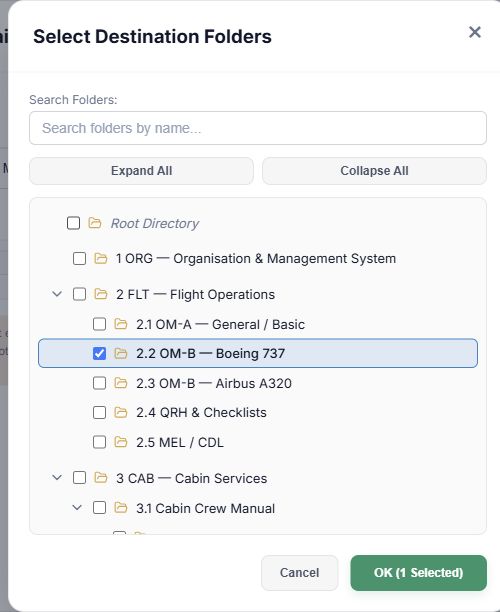
Figure 2. 1 — Search Folders: narrows the tree by name. 2 — Expand All / Collapse All: opens or closes branches. 3 — Folder checkbox: selects the destination; Root means no folder. 4 — OK: returns the selection to the upload form. Cancel discards changes in this picker.
Choose the audience
- Under Target Distribution Groups, tick each entire group that should receive the document. The badge shows active members and, where applicable, deactivated accounts marked off. The chevron opens a group so you can inspect its members; it does not select the group.
- To address a few people rather than an entire group, expand the group and tick individual active members, or type at least two characters into Also send to specific people and select a result. The × beside an added person removes that individual address. Deactivated users are not selectable. Someone already covered by a selected group is shown as covered and counted once; a group tick cannot be overridden person by person.
- Check the audience summary. No recipients selected means nobody will receive an email or acknowledgement assignment. A folder is a filing location, not a substitute for choosing an audience.
The group selection follows membership; an individually addressed person is a specific selection. Check the count again whenever you change groups or individual people.
Set acknowledgement and email options
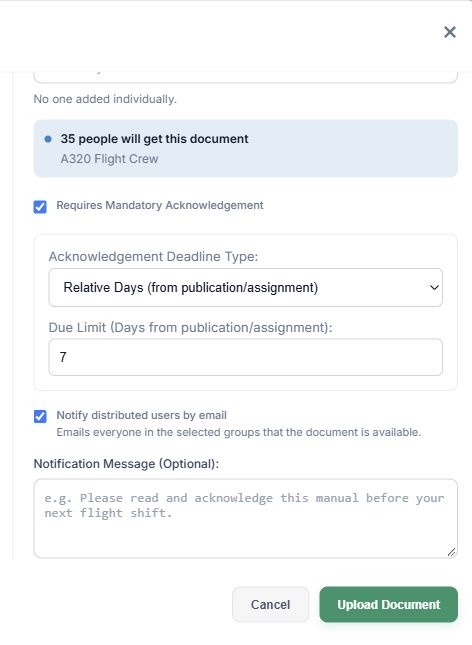
Figure 3. 1 — Audience summary: count after duplicate and deactivated-account handling. 2 — Requires Mandatory Acknowledgement: creates a signing obligation for the distributed users when selected. 3 — Deadline type and value: No Deadline, Relative Days, or Fixed Calendar Date. 4 — Notify distributed users by email: controls the publication email independently. 5 — Optional message: included only if email is on. 6 — Upload Document: starts publication; Cancel discards the form.
- Decide whether to tick Requires Mandatory Acknowledgement. It starts off. If you turn it on, Vega also turns Notify distributed users by email on initially; you can change the email choice separately. The deadline controls appear only while acknowledgement is required.
- Choose Acknowledgement Deadline Type: No Deadline (Unlimited Time), Relative Days (from publication/assignment), or Fixed Calendar Date. A new upload starts at Relative Days, 7. The relative limit must be at least one day. For a fixed date, choose a calendar day and check the preview. No deadline does not remove the signature obligation.
- Decide whether to tick Notify distributed users by email. It starts off when acknowledgement is off. The checkbox is independent of the acknowledgement setting: a reference document may still be announced. If selected, you may enter a Notification Message (Optional); Vega adds its standard document notice. The message is not used when email is off.
- Recheck the file, title, folder, audience count, acknowledgement requirement, deadline, and email choice. Select Upload Document once. The button changes to upload progress, then publishing. Cancel upload is available only while bytes are still transferring; once the server is processing, cancellation is no longer reliable and the form does not offer it. Wait for the success message and verify the new card in the library.
Cancel or the form's × closes without uploading before submission. If the upload fails, read the error and check the library before retrying; do not assume a file was published. If a reader cannot preview a non-PDF, they can still download it, but a mandatory acknowledgement requires them to check the correct file before signing.