Set notice audience, deadlines, and attachments
For: Notice managers (NOTICE_MANAGE)
Before you start: Open Notices → Manage → New notice, Edit draft, or Amend.
Last checked: 7 October 2026, fictional local demo v1.126.2 and current Notices code
These controls decide who receives a notice, when acknowledgement becomes overdue, and when it leaves active inboxes. Recheck them before every publication or material revision.
Acknowledgement and due date
- Requires read-acknowledgement starts on. Keep it on for an obligation that requires an auditable confirmation. Clearing it hides Deadline and disables Blocking. An informational notice can still be read in the Current inbox.
- Blocking starts off. When on, the internal recipient must open any attachments and acknowledge the notice before continuing in Vega. An ordinary high or critical priority notice is not automatically blocking. External organisation recipients are not hard-blocked.
- Under Deadline, choose one of three modes (Figure 1, 1):
- No deadline (default): acknowledgement remains pending but has no due date and is not counted overdue. Scheduled Notices reminders only run for notices with a deadline.
- Within N days of receipt (personal): a separate due date for each eligible recipient, measured from when that person first becomes eligible. The Days field beside Deadline initially shows 7 when this mode is selected; it is not active while No deadline is selected. Enter at least 1 day. A newly eligible group member gets their own window.
- Fixed date (shared): the same Due date for all recipients. Enter the date in the field that appears. The selected calendar day is stored as the deadline's end in UTC by the current form.
- Expiry (optional — auto-archives after this date) (2) is separate from the acknowledgement deadline. Leave it blank for no scheduled expiry. After expiry, the scheduled archive job removes the notice from active inboxes; it does not erase recorded acknowledgements. Use Archive / recall for an earlier manual stop.
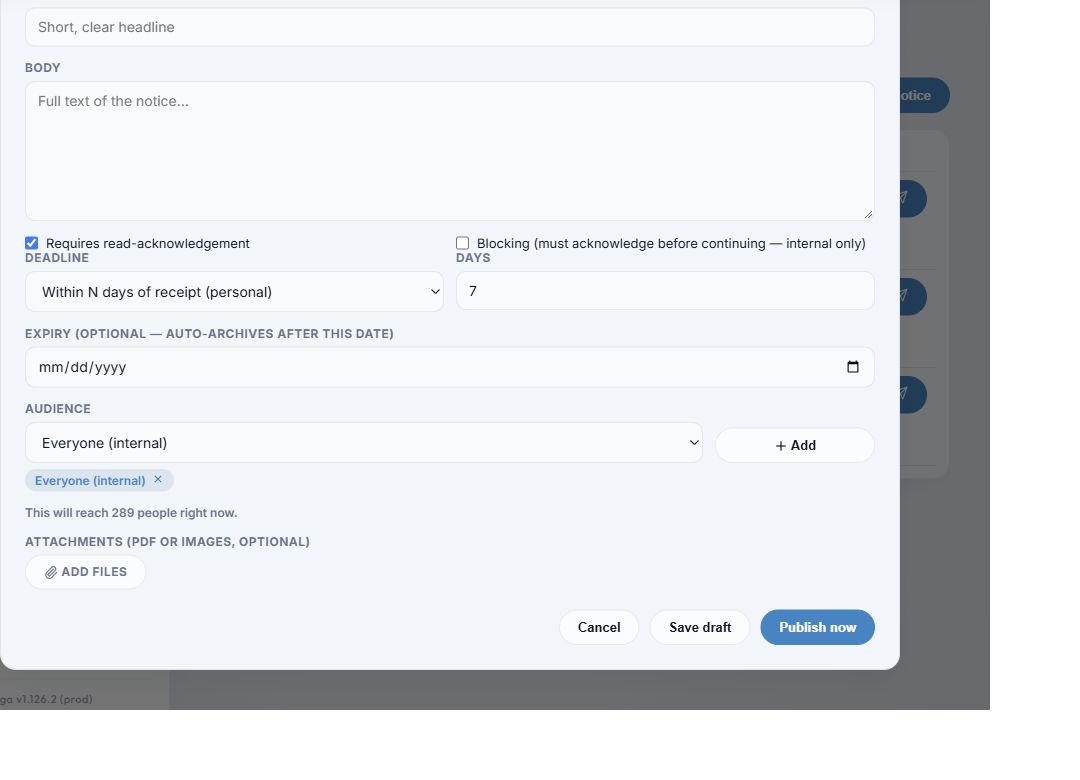
Figure 1. 1 — Deadline and Days: here the personal seven-day option is selected. 2 — Expiry: optional separate date. 3 — Audience rule and chip: choose a kind of recipient, select Add, then review or remove the chip. 4 — Reach preview: current matching active people. 5 — Add files: attach supporting material. 6 — Cancel. 7 — Save draft. 8 — Publish now.
Build the audience
- Under Audience choose a rule (3). Everyone (internal) is selected initially but does not become a target until you select Add. For other rule types, select a specific item in the second picker, then Add.
- Available rule types are:
| Rule | Who it reaches |
|---|---|
| Everyone (internal) | Active internal users in this company. It does not include external organisations. |
| Group | Active members of the selected distribution group. |
| Role | Active internal users with the selected role. |
| Department | Active internal users whose department exactly matches the selected value. |
| User | The selected active user in this company. |
| External org | Active users of the selected active external organisation, while its access and acknowledgement permission remain valid. |
- Each added rule appears as a chip (3). The × / Remove button removes that rule. Add multiple rules to include the union of their recipients: a person matching two rules is counted once. Duplicate rules are ignored.
- Read This will reach N people right now (4). Vega calculates this preview from current roles, group memberships, departments, user status, and external access. Audience rules remain dynamic after publication: a newly eligible person can receive an active notice later. A preview of 0 means the notice cannot be published; check the selected group/role/organisation and active membership. A saved draft can have zero current recipients.
Privacy check: The User picker and read-tracking report can display names and email addresses. Avoid putting their screenshots in a shared help article unless anonymised.
Add or remove attachments
- Select Add files (5) to choose one or more PDFs or images: PDF, PNG, JPG/JPEG, GIF, or WebP. The composer keeps at most 10 newly selected files. The server rejects unsupported formats and files above its 25 MB per upload limit.
- A selected file appears in the list. Use its × / Remove button before saving if you chose it by mistake. While editing a saved draft, removing an existing attachment deletes it from that draft. While amending an active notice, attachment removal is staged until Publish revision or Save changes.
- Recipients must open every attached file in the notice viewer during their current reading session before the acknowledgement button becomes available. The viewer offers Back, an external-viewer button, and, if inline viewing fails, Download. See Read and acknowledge a notice.
Choosing safe settings
Use INFO and no acknowledgement for a routine announcement; choose a deadline when completion must be monitored; use Blocking only when access must wait for confirmation. Always check the reach preview and the final action button. Save draft leaves recipients unaffected; Publish now makes the notice active. For an already active notice, read Manage drafts, revisions, and archive before changing its audience or obligation.